The Complete Guide to Google Play Console for App Marketers
Whether you’re an app marketer, owner, or developer, you know that getting your app onto the Google Play Store is only half the battle. You also need to ensure it’s optimized for search and visibility, effectively marketed to your target audience and delivers vital performance metrics to keep users engaged and coming back.
To accomplish all this, you must master the Google Play Console. In this central hub, you can manage your app’s presence on the Google Play Store and access key insights into user behavior and performance metrics. However, with a wide range of features and tools to explore, it can be challenging to know where to start.
That’s why we’ve put together this comprehensive guide to the Google Play Console, which will take you through everything you need to know to get the most out of this powerful app marketing tool. Whether you’re just starting or looking to optimize your existing app strategy, this guide will equip you with the knowledge and skills you need to succeed.
What is Google Play Console?
The Google Play Console is a web-based platform that app developers and marketers can use to manage their apps’ presence on the Google Play Store. It provides various tools and features that enable you to upload and publish apps, monitor app performance metrics, engage with users through reviews and feedback, and track user acquisition and engagement.
The Play Console is an essential tool for any app marketer who wants to succeed on the Google Play Store, as it enables you to gain deep insights into user behavior and performance metrics, optimize your app listing for search and visibility, and drive user acquisition and engagement through targeted marketing campaigns.
One of the key advantages of the Play Console is its ease of use. You don’t need any technical knowledge or coding skills to use it effectively – anyone can create an account, upload their app, and monitor its performance.
In the next section, we’ll explore how to set up your Google Play Console account and navigate the dashboard.
How to Set up Your Google Play Store Account
Setting up your Google Play Console account is a straightforward process that can be done in just a few steps. To get started, head to the Google Play Console website and sign in using your Google account.
Once you’re logged in, you’ll be taken to the console’s dashboard, which provides an overview of your apps and performance metrics. From here, you can easily navigate to different sections of the console, including the app publishing portal, performance metrics, user feedback, and more.
- To set up your first app, click the “Create App” button and follow the prompts to provide information about your app, including its name, description, screenshots, and other details. You’ll also need to upload the app’s APK file, which contains the code that runs the app.
- After completing these steps, the Google Play team will submit your app for review. This process can typically take anywhere between a few hours to a few days, depending on the complexity of your app and any potential issues that may need to be resolved.
While your app is being reviewed, you can start optimizing your app listing for search and visibility. This includes choosing relevant keywords, crafting compelling descriptions and titles, and selecting engaging screenshots and videos that showcase your app’s features and benefits.
- With your app published and optimized for search and visibility, you can start monitoring its performance metrics and engaging with users through reviews and feedback.
Looking to Maximize Your App’s Potential?
Our team is always ready to help!
Part 1: Getting Started With Google Play Console
After covering the groundwork of creating your Google Play Console account and setting up your app, let’s delve into the console’s sidebar.
In this section, we’ll explore the Dashboard, Inbox, Statistics, and Publishing Overview tabs.
The Main Dashboard
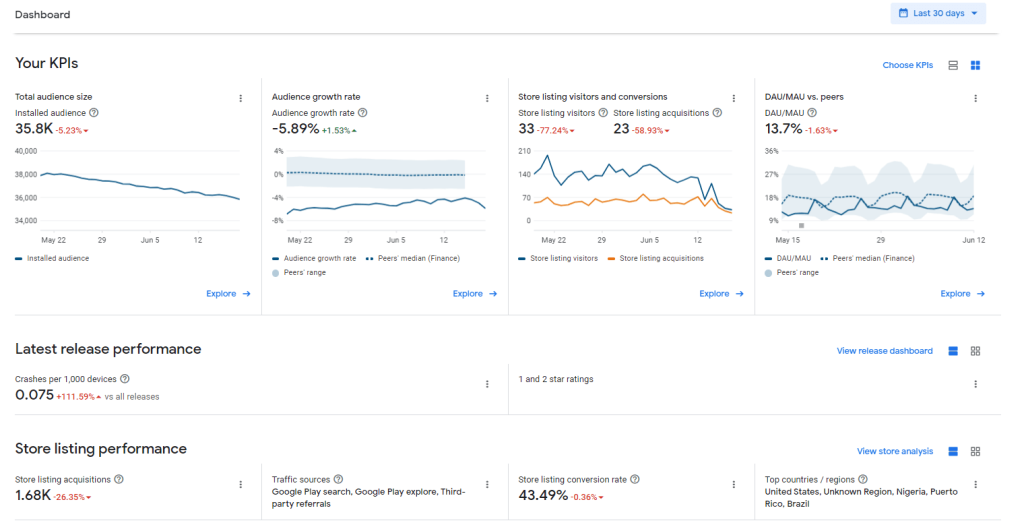
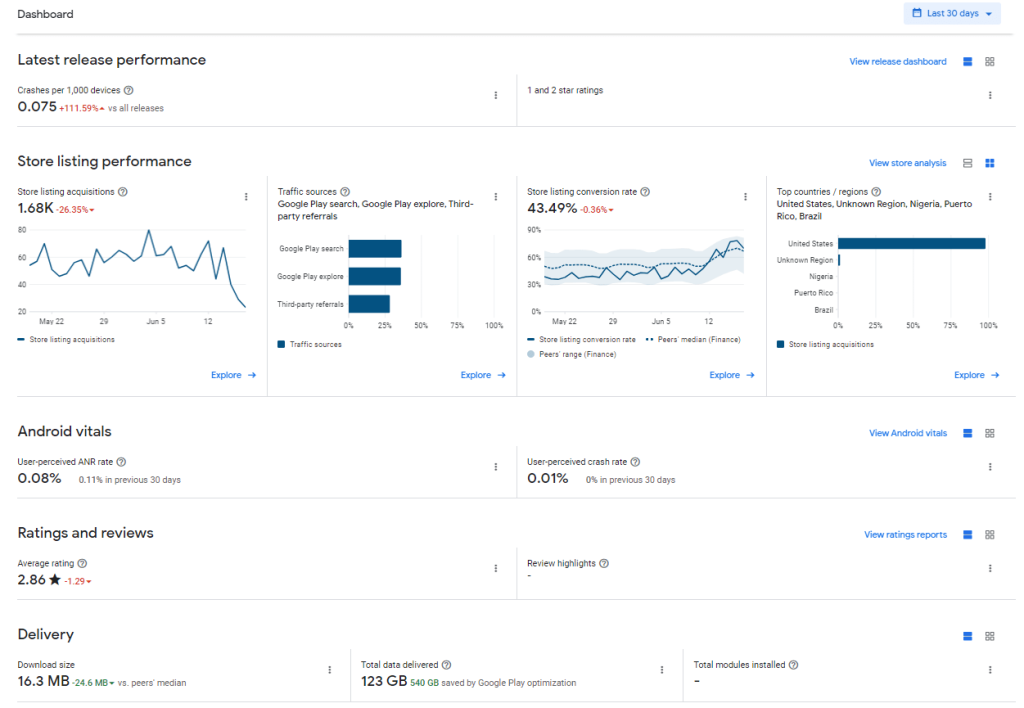
The Dashboard tab in Google Play Console provides a customized overview of your app’s performance. It displays high-level key performance metrics, reviews, ratings, Android vitals, and user acquisition information. Here is a breakdown of what you can see:
Inbox View

The first thing you’ll see in the main dashboard is a summary of the latest messages from your account’s inbox. Here, you can view important updates about your app, explore new Google Play Console features, and more.
KPIs
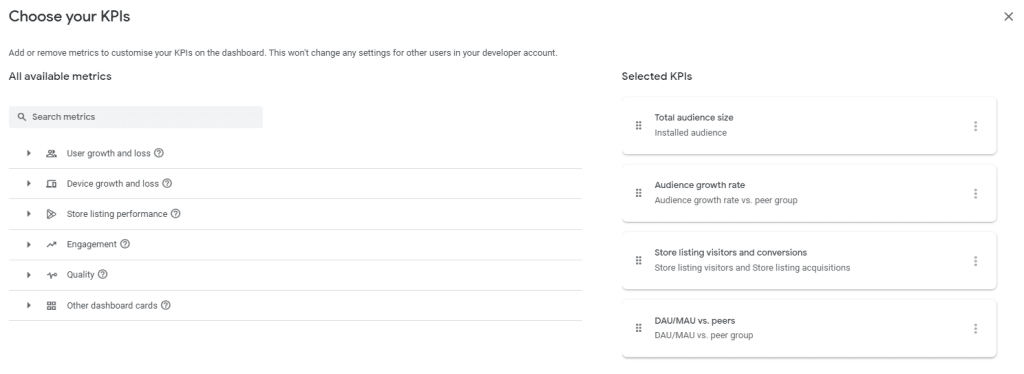
The beauty of the dashboard view lies in its versatility, as it can be tailored to your specific requirements. For instance, the customizable KPIs enable you to selectively track the metrics that are most relevant to your app’s performance. These include your store listing performance, audience growth rate, and other user acquisition metrics to help you keep track of your app’s success.
Store Listing Performance, Android Vitals, Ratings & Reviews, and Delivery Information
The final tab in the Dashboard section displays additional information and detailed statistics about your app. Keeping tabs on this data is important, as it enables you to responsively address user feedback and ensure that your app remains well-maintained and optimized for performance.
Inbox
As mentioned, the dashboard section view will provide you with the latest messages from your inbox. For a deeper dive, go into the “Inbox” section to explore updates, recommendations, messages, and milestones related to your app.
Statistics
In the Statistics section, you can find detailed performance data for your app, including installs, ratings, revenue, and crashes. You can also compare your performance to others on Google Play using the Compare to Peers tab, which provides data on growth and conversion rates.
App Statistics
The app statistics report can be configured to view and compare your app statistics through different audience types and metrics. You can filter the different sections according to your preferences and goals.
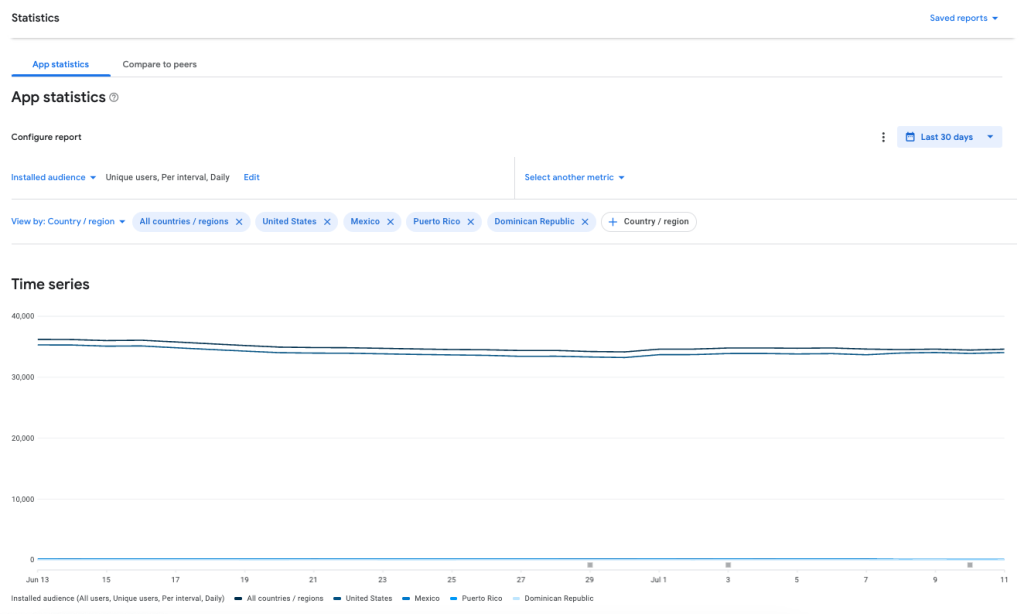
If you want to keep track of your app’s performance, it’s important to monitor several metrics.
You’ll want to pay close attention to the following:
- User Acquisition and Loss
- Device Acquisition and Loss
- User Engagement
We recommend also keeping tabs on your ratings, app quality, monetization, pre-registration, and store listing performance.
To get a more in-depth look at your app’s metrics, segment your data by country, region, Android version, device type, language, app version, and carrier.
- For optimal results, it’s essential to identify key areas relevant to your app’s goals and priorities. Take the time to evaluate these factors and develop a strategy accordingly.
Finally, in the “App Statistics” tab, you’ll also find some educational pages that can help your team better understand the value of key features and how to work them into your workflows.
Looking to Skyrocket Your App’s Ranking?
Our team of ASO experts is always ready to help!
Compare to Peers
It’s always a good idea to compare your app’s performance to your competitors in the Play Store. Similar to Apple’s Peer Group Benchmarks, Google Play Console offers comparative data so you can see how your app stacks up against the competition.
In the “Compare to Peers” tab, you’ll see two types of peer groups: primary and secondary. These can help you identify areas for improvement and make data-driven decisions.
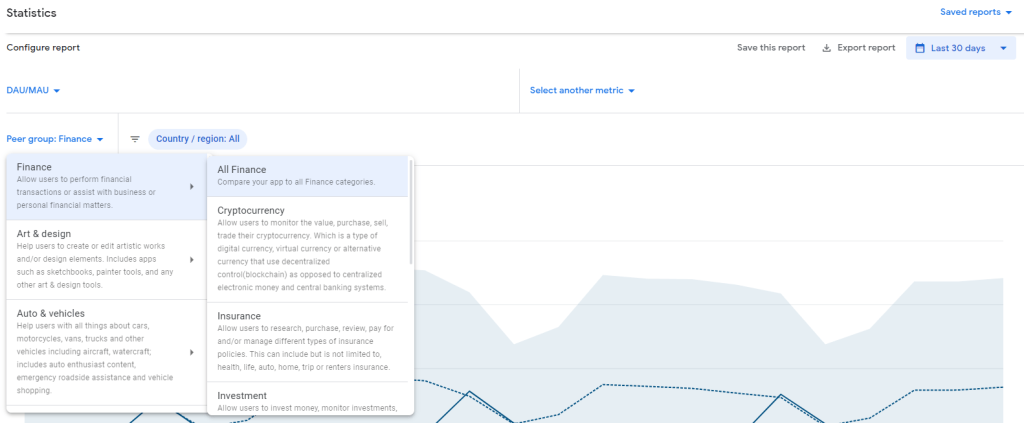
Let’s break down the two types of Peer Groups:
- Primary peer groups: these are used to compare your app’s performance against apps with similar characteristics, such as genre, size, and user ratings.
Primary peer groups are created by selecting up to 12 apps from the Google Play Store that share similar characteristics with your own app. This allows you to compare your app’s Android vitals and ratings with those of other apps in the same genre or size range.
- Secondary peer groups: these are used to compare your app’s performance against a larger set of apps in the same category.
Secondary peer groups are created by selecting up to 12 apps from the Google Play Store that belong to the same category as your app. This allows you to compare your app’s Android vitals and ratings with those of other apps in the same category, regardless of their genre or size range.
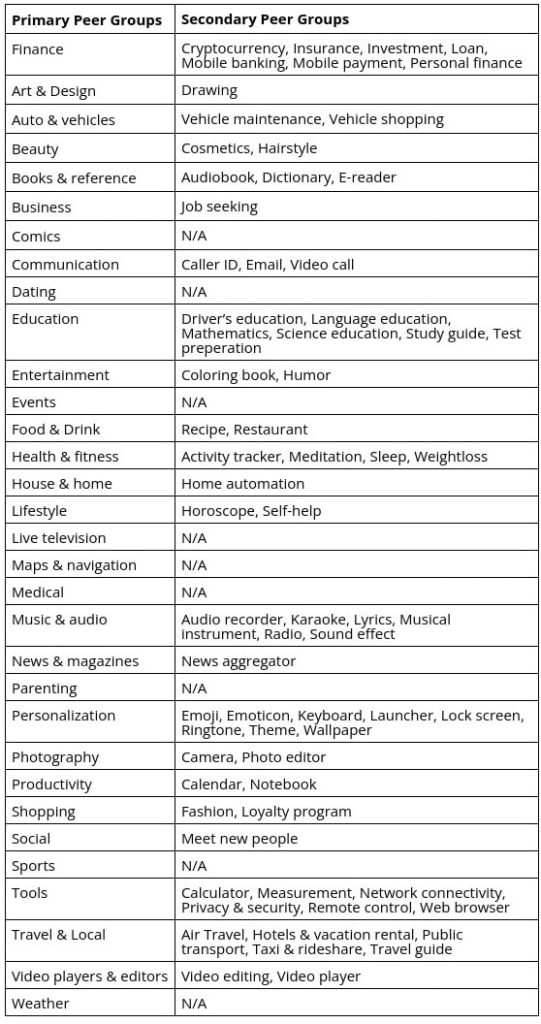
- You can compare your app with all the apps in its primary peer group category, or you can choose to compare it with specific secondary peer groups within that category. Select the approach that best suits your needs and goals.
There is a range of categories available to choose from for both peer groups types:
Publishing Overview
The Publishing Overview section provides an overview of all the changes made to your app and allows you to control the timing of certain changes being sent for review or published. You can also see which changes are ready to be sent for review, in review, or ready to be published.
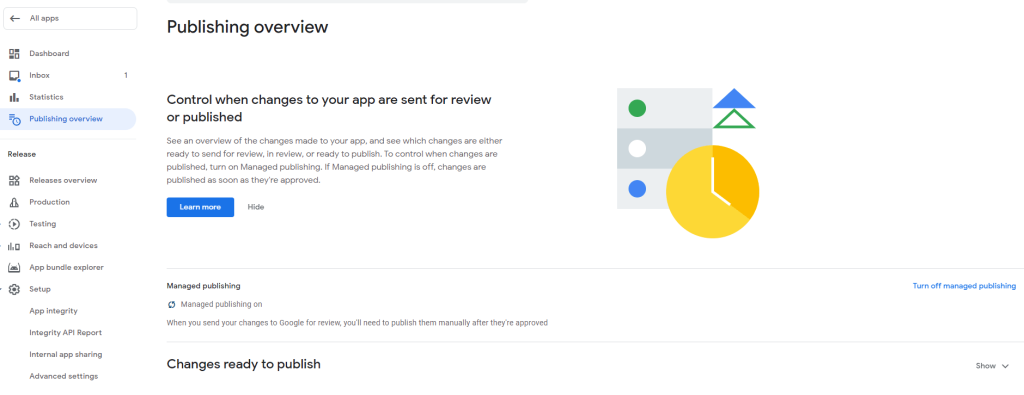
- If you want more control over when your changes are published, you can turn on Managed publishing. This will allow you to decide exactly when your changes should be published. Keep in mind that if Managed publishing is off – any approved changes will be published immediately.
Part 2: Release
The “Release” section on Google Play Console helps you monitor the availability of your app across different tracks, such as Production, Testing, and more. You can view the countries where each of your tracks is live and select individual releases to delve into the details. This section offers valuable information for app developers but is not limited to them. Marketers can also greatly benefit from exploring these insights.
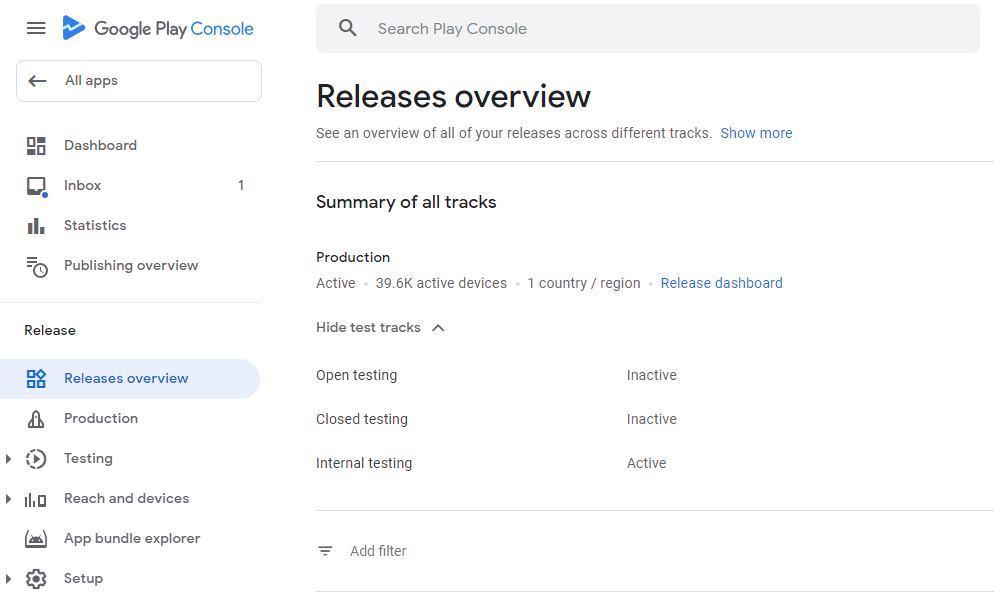
Here are the functions you can explore in the Release section:
Releases Overview
This tab provides an overview of all the releases across different tracks, including the current and previous ones.
Production
This is where the app’s final version is released to the public. Marketers need to be aware of the production version as it’s the one that users will download and use.
Testing
Before releasing the app to the public, it’s crucial to test it thoroughly. You can use this function to understand the feedback from the testing phase and make necessary adjustments.
- To increase your app’s visibility in the Google Play Store, We suggest utilizing the Pre-registration function under “Testing.” By setting up pre-registration for your app, it will be listed on the Google Play Store before launch. Upon launching, pre-registered users will receive a notification to download your app and even get an automatic installation on eligible devices.
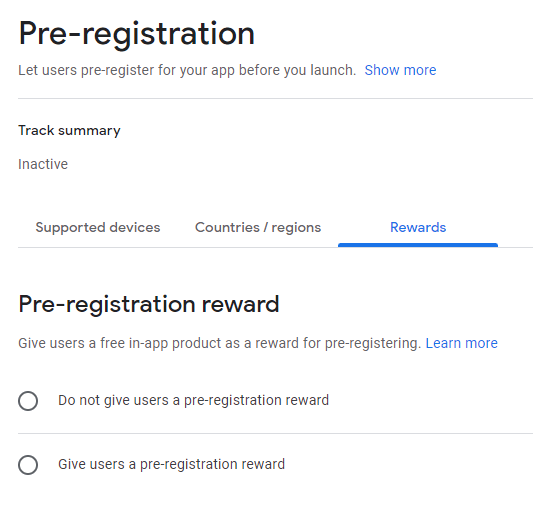
- To set up pre-registration for your app, upload up to 20 app bundles to specify the devices that users can use to pre-register in the “Supported devices” tab. Then, go to the “Countries / regions” tab to manage the countries and regions where your app is available for pre-registration.
- To encourage user pre-registration, consider offering rewards in the form of free in-app products. It’s a simple and effective way to entice new users and ensure their continued engagement with your app.
Reach and Devices
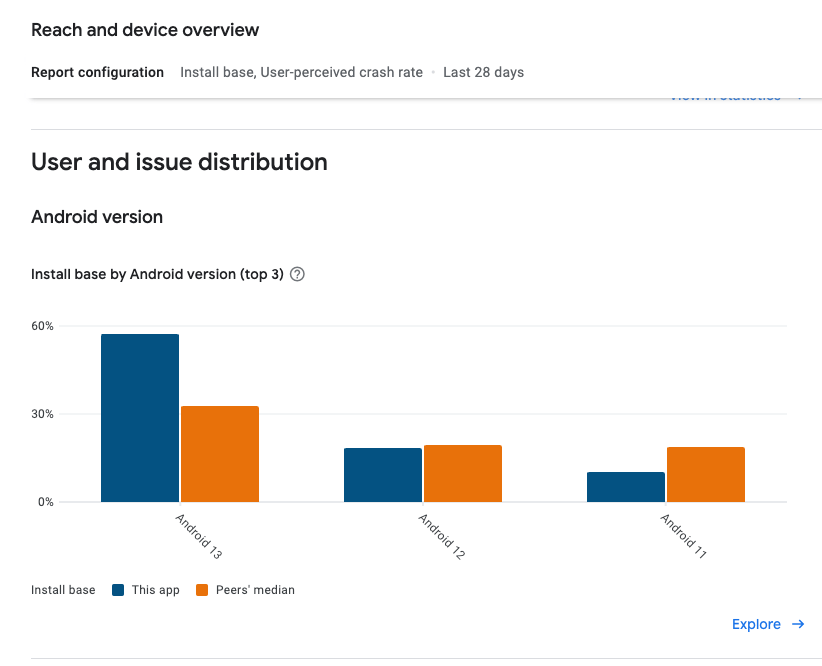
This section provides details regarding the compatible devices for your app and the geographical availability across various countries. Additionally, there are user and issue distribution reports that display the install base by Android version, comparing the top three based on your app versus your peers’ median.
App Bundle Explorer
This section provides an in-depth evaluation of your Android App Bundle. While primarily targeted at developers, marketers can benefit from gaining insights into the app’s technical aspects and structural framework.
Setup
While not specifically relevant to app marketers, the Setup tab under the Google Play Console’s Release section encompasses crucial app settings. These settings include app integrity, internal app sharing, and advanced configuration options that influence app availability and indexing.
Looking to Decrease Your CPS (Cost Per Subscription?)
Our team of mobile experts is always ready to help!
Part 3: Grow
The “Grow” section in Google Play Console has three core components: Store Presence, Store Performance, and Deep Links. We’ll explore each in-depth and demonstrate how they can be useful to enhance ASO efforts.
Store Presence
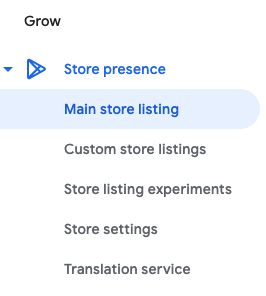
Main store listing
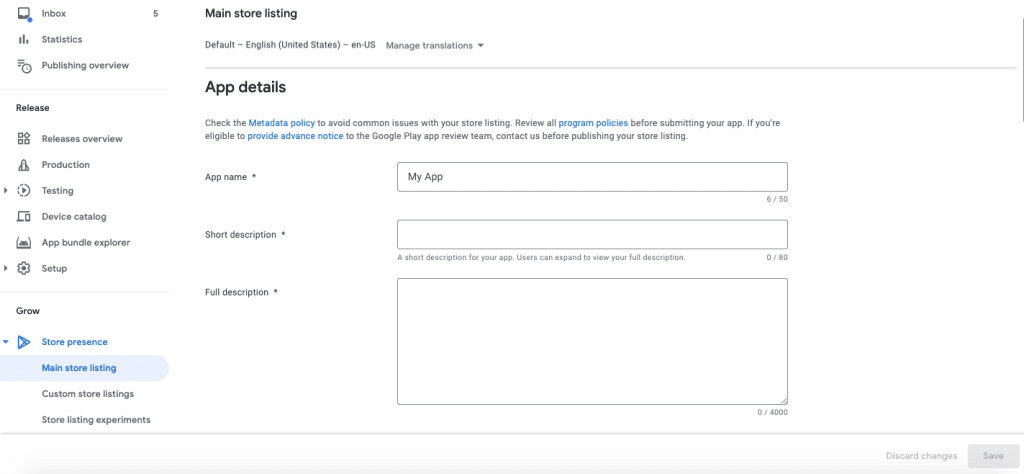
This is where the ASO magic happens. Here, you can fine-tune everything from your app’s name, short and full descriptions to app graphics and more. Give your listing the attention it deserves, as it can significantly enhance your app’s success.
Custom store listing
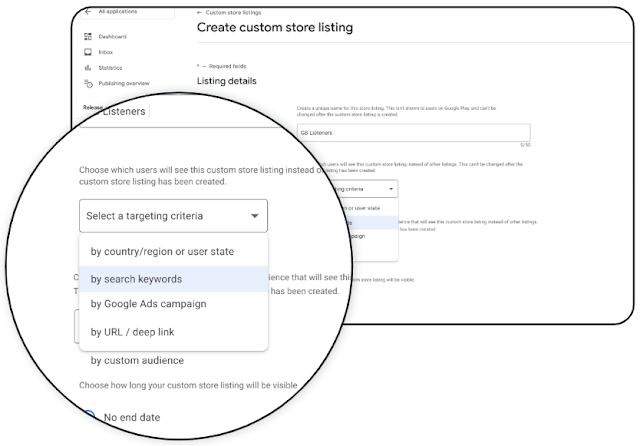
Not all referred audiences are exactly the same. Custom store listing allows you to create a custom listing for users who were referred via a special URL link. It’s great for marketers who want to showcase specific app features to a specific audience.
Here are some custom store listings types you can create:
- Custom Store Listing for a Segmented Audience: Create a unique listing that emphasizes a specific feature of your app with dedicated descriptions and a set of screenshots. This way, you can target an audience who sees value in this feature as opposed to a general audience.
- Custom Store Listings by Country: Every country has its own distinct and celebrated culture. Whether your aim is to tap into Spanish-speaking territories or something else, it’s easy to do so with custom listings for specific countries or groups of countries. Note that you can only target a single country with a custom store listing at a time.
- Localized Custom Store Listing: With the ability to create translations for descriptions, app names, screenshots, and videos, you can test your app in new markets and improve your conversion rate in lower customer-based countries.
- Custom Store Listing for Targeting Inactive Users: This feature allows you to show a different store listing to users who have uninstalled your app or ones who haven’t used it for at least 30 days.
- Custom Store Listing by Keyword: Google has recently added the option to optimize your app’s discoverability with CSLs based on user search keywords. Creating multiple CSLs that target users who are actively seeking your app’s benefits to match specific keywords can be a great way to improve visibility. Make sure to experiment with short and long-tail keywords to see which resonate best with your audience.
Custom store listings come equipped with another nifty feature: Groups.

- In the Groups tab, under Custom Store Listings, you can create groups that cater to various purposes. Whether it’s event-themed groups targeting specific countries or any other use case, the possibilities are endless.
- Effective utilization of these groups can boost the visibility of your apps. To quickly generate variations of your main store listings, simply start by editing the default group named “Main Store Listing Group.”
Store listing experiments
The ASO fun continues with Store listing experiments, where you’ll run A/B tests on your main app store listing.
We have a full guide on how to A/B test your app on both the App Store and Google Play Store, so we won’t go into too much detail here. For now, know that you can use this section to test your app’s description, icon, video, screenshots, or any other assets to try and achieve the best CVR (conversion rate).
Store settings
Optimizing your app’s store settings is crucial for successful ASO. Although they may seem straightforward, these settings can have a significant impact on your app’s performance in the Play Store.
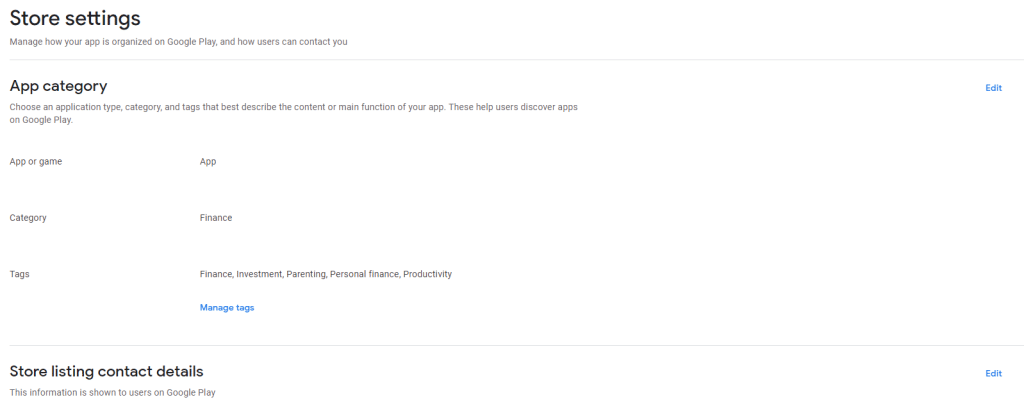
When listing your app or game in the Console, you can choose its category and tags. Choosing the right app category and tags is critical, as this decision can affect your app’s visibility and discoverability.
Translation Service
Within the Store presence section, you will find the final tab that outlines two distinct translation choices: paid human translation or machine translation. Utilize these options to effectively localize your app and make it accessible to users worldwide.
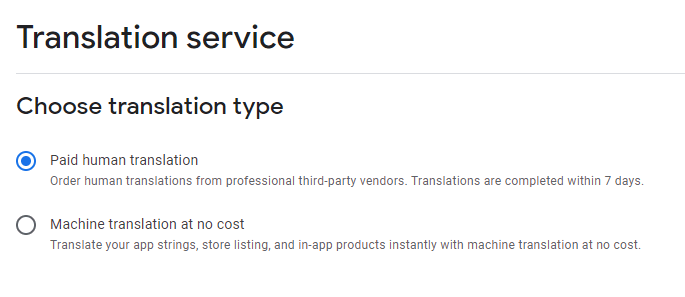
- A new model from Google Translate was announced at Google I/O 2023, which offers machine translation for ten languages in the Play Console. This service can help developers and marketers connect with potential customers in their native language.
- You can use the free machine translation service to translate your app strings, store listings, and even in-app products.
It is worth highlighting that even though AI-powered translation can contribute towards maximizing app store presence, efficient app store optimization requires specialized knowledge and strategic positioning. Partnering with an App Store Optimization agency that specializes in app localization and internalization can ensure that your app’s visibility is truly maximized.
Looking to Maximize Organic Installs for Your app?
Our team of mobile experts is always ready to help!
Store Performance
The Store performance section is divided into two subsections: Store analysis and Conversion analysis. Here, you’ll monitor your app listing performance and analyze your store listing visitors, acquisitions, and conversion rates. Similar to the Statistics tab, you can filter the data by country and language and select between new or returning users.
Store Analysis
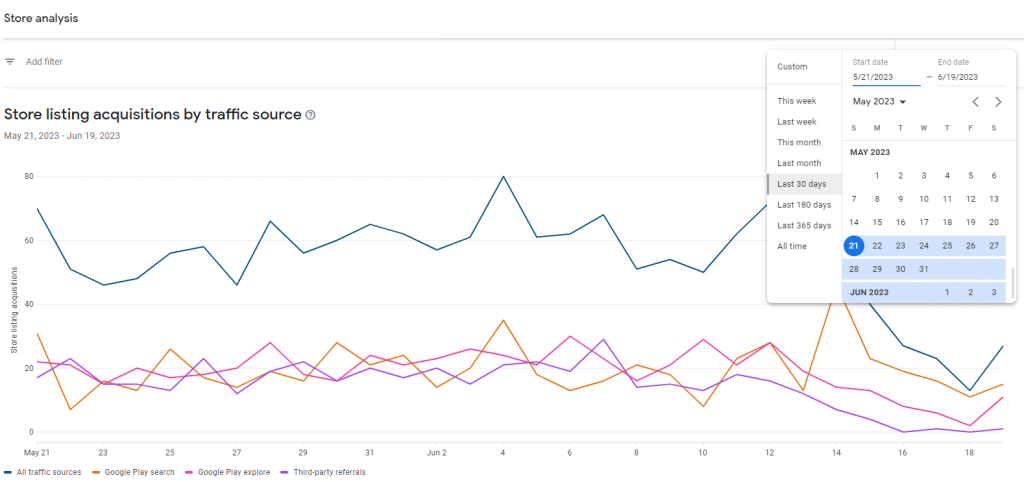
The Store analysis subsection allows you to view and compare your overall store listing performance across different metrics such as traffic source, country, and search item.
- Store listing acquisitions by traffic source include Google Play search, Google Play explore, and Third-party referrals. You can view or compare your store listing acquisitions to a previous period of your choice.
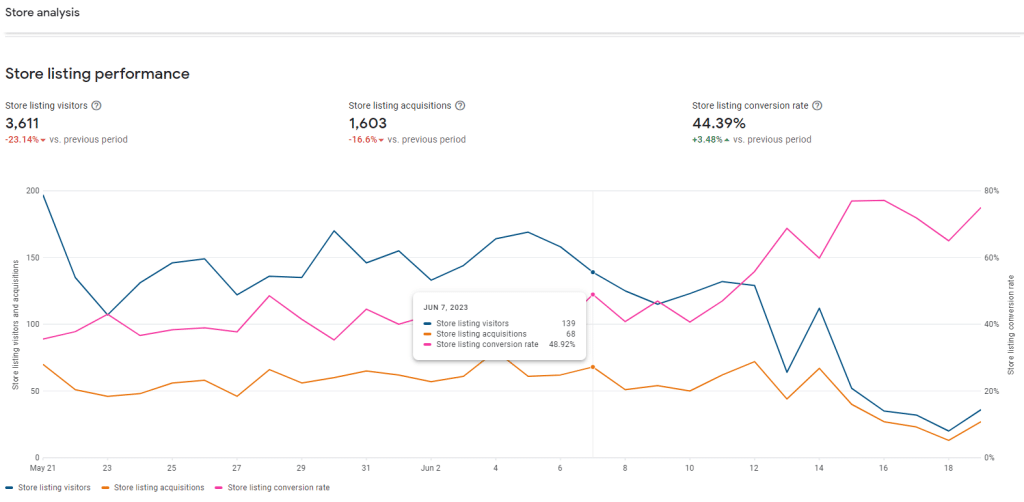
- Store listing performance shows you important information regarding your visitors, acquisitions, and conversion rate.
- Store listing acquisitions are broken down into sections that provide insights by countries, languages, search terms, explore search terms, app install states, UTM sources and campaigns, and store listings (which detail whether the user has visited your main store listing or a custom one).

While the Store Analysis tab gives you a high-level overview of the most important categories and their performance, more detailed insights are available when you explore each category in the conversion section.
Conversion Analysis
This tab provides a granular view of your store analysis reports which is extremely important for ASO.
You can customize the store listing conversion analysis report view by selecting one of the following metrics:
- App install state
- Country / region
- Language
- Search term
- Store listing
- Traffic source
- UTM campaign
- UTM source
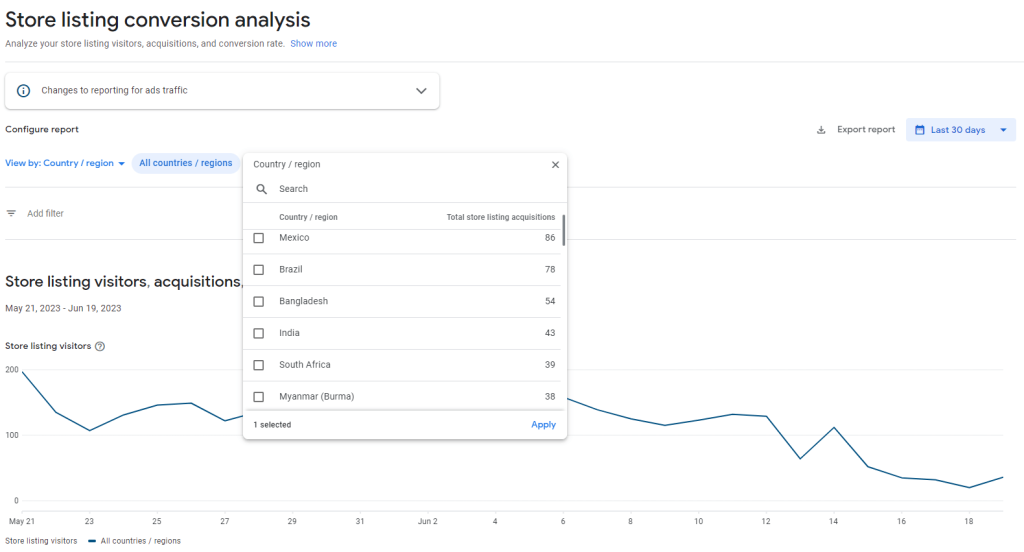
- These reports allow you to gain a more in-depth view of each attribute by filtering them further. For example, you can look at the total store listing acquisitions in selected regions, languages, and more.
- These insights will allow you to get a feel for areas where you may be falling short and help you optimize your app store listing accordingly.
- For example, a bad conversion rate will negatively impact your app’s Play Store ranking. This could be due to using the wrong screenshots, having an ineffective app description, or other reasons that could affect your ASO efforts. Check out our full guide to App Store Optimization to learn more.
Deep Links
Let’s delve into the last tab under the “Grow” section of Google Play Console – Deep Links.
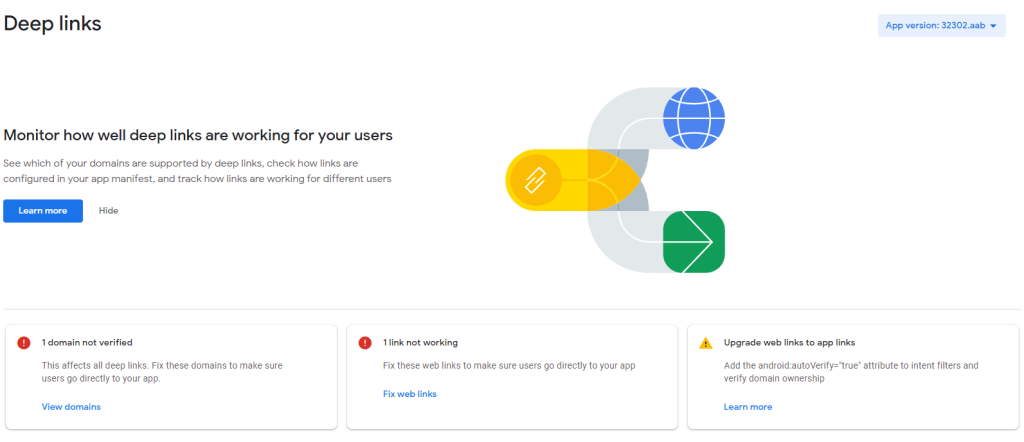
- This tool allows you to oversee the effectiveness of deep links, verify supported domains, audit your app’s manifest, and track usage by individual users.
- Monitoring deep link activity helps you to enhance your app’s overall user experience by detecting any potential issues that may be disturbing it.
Want to Achieve Mobile Hypergrowth?
Moburst clients recieve an average of 32% increase in organic downloads within the first 6 months
Part 4: Quality
The Quality section in Google Play Console is comprised of two main reports – Ratings and reviews & Android vitals. Let’s go through each and explain how they contribute to ASO.
Ratings and Reviews
Maximizing the potential of ratings and customer reviews is crucial to ensure your app is well received.
This section covers four different reports:
Ratings
Users can rate their experience with your app from 1 to 5 stars, which helps others make informed decisions about installation.

In the Ratings report, you can:
- View the rating analysis by country, app versions, and similar apps on Google Play,
- Measure rating performance over time
- See your app’s rating distribution
- Get a detailed breakdown of your averaged ratings by Country / region, Language, App version, Android version, Device, and Form factor (Tablet / Phone).
Reviews
Here, you can read, respond to, and manage your app’s user reviews. We highly recommend monitoring and responding to your app’s user reviews, as this can improve user satisfaction and increase downloads.
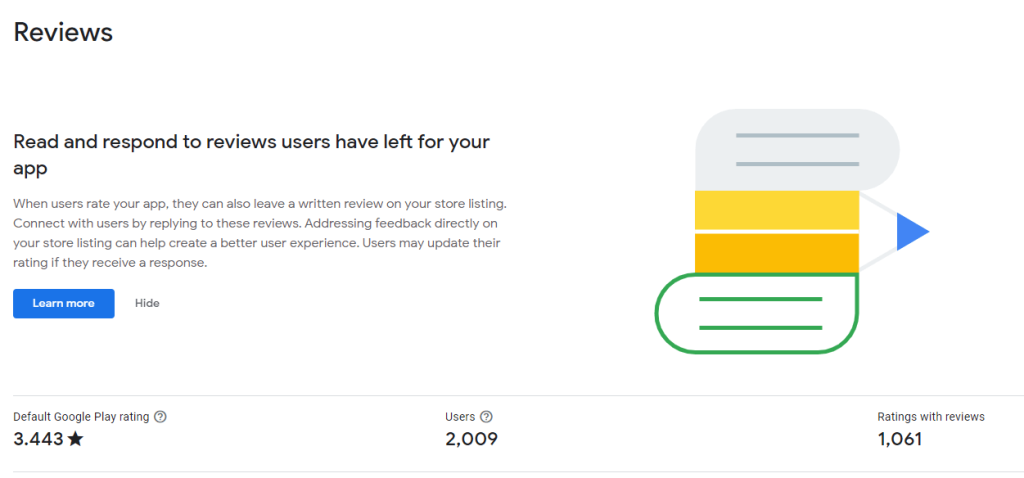
Reviews analysis
This report makes it easier to gain actionable insights about your users’ reviews. Here, you’re able to view common themes across your reviews in the form of topics and benchmarks.
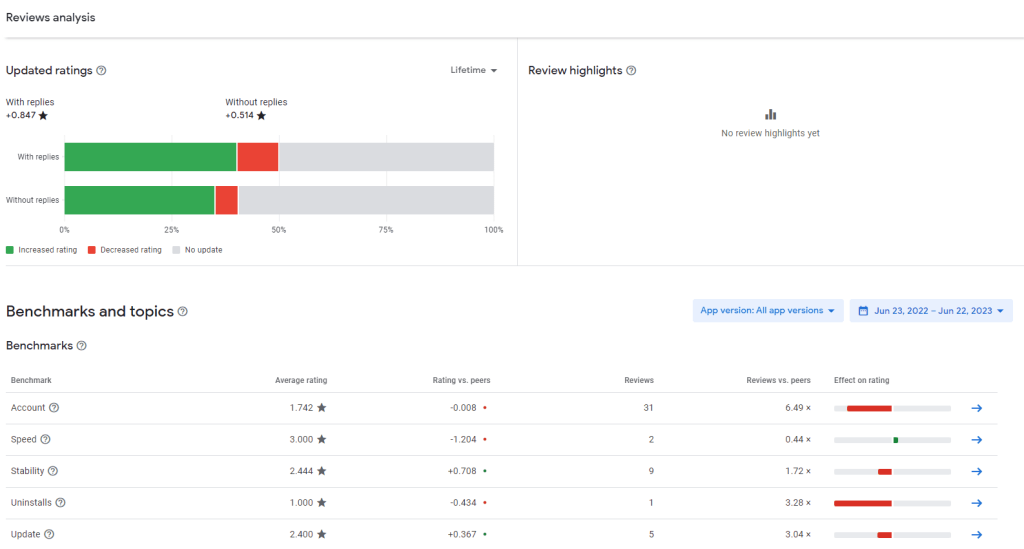
- Each report displays the benchmark or topic impacting your app’s rating on the right-hand side. This can allow you to determine whether it’s worth addressing or not.
- Examining popular topics and benchmarks can also help you identify issues with your app, or shine a positive light on specific features you may want to highlight in your app metadata & assets.
Testing Feedback
Whether you’re conducting an open or closed test, this section allows you to access valuable feedback from testers. It’s important to bear in mind that this information is kept private and won’t have any bearing on your app’s rating.
Understanding Android Vitals
Monitoring and improving the technical quality and discoverability of your app is critical, and that’s where Android Vitals come in. This data provides you with a detailed overview of core vital metrics, which makes it easier to identify areas for improvement. Fixing these issues can lead to a better user experience and higher ratings.
Although this section mostly targets developers, marketers should note that Google Play’s algorithms rely on these metrics to determine your app’s ranking. For example, exceeding bad behavior thresholds could lead to warnings being displayed on the store listing, so make sure you’re checking this tab for potential issues.
Let’s take a closer look at each of the reports under this section:
Android Vitals Overview
As the name suggests, this report offers an insightful overview of your app’s technical quality and discoverability. The report begins with personalized recommendations based on your app’s potential issues, such as slow start-up rates on certain devices.
These recommendations should not be overlooked, as they can potentially impact your app’s visibility on Google Play.
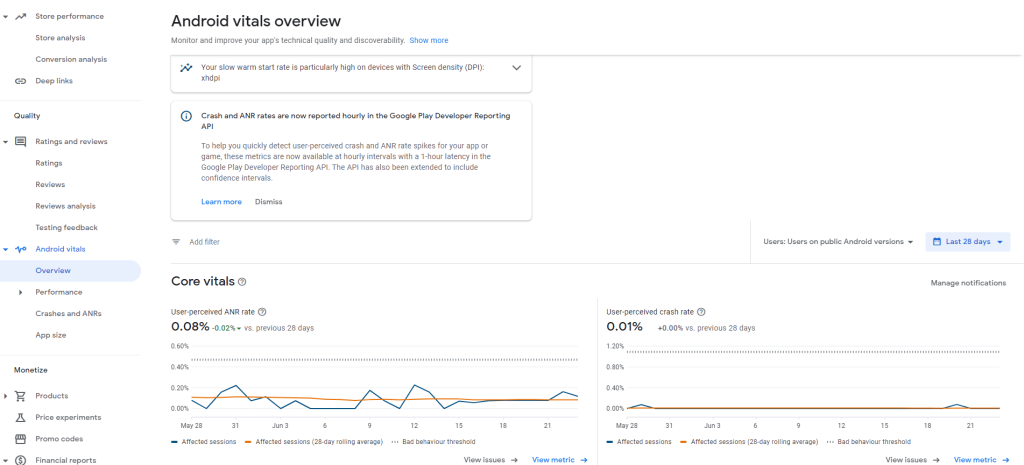
The additional information you’ll see in this report includes:
- Core Vitals: These refer to key metrics that directly influence user experiences, like the User-perceived ANR (Application Not Responding) rate and User-perceived crash rate. Keeping these rates low is crucial for any app. It’s worth remembering that Google has established a threshold for acceptable performance, with the bad-behavior threshold for the user-perceived ANR rate set at 0.47% and the bad-behavior threshold for the user-perceived crash rate set at 1.09%.
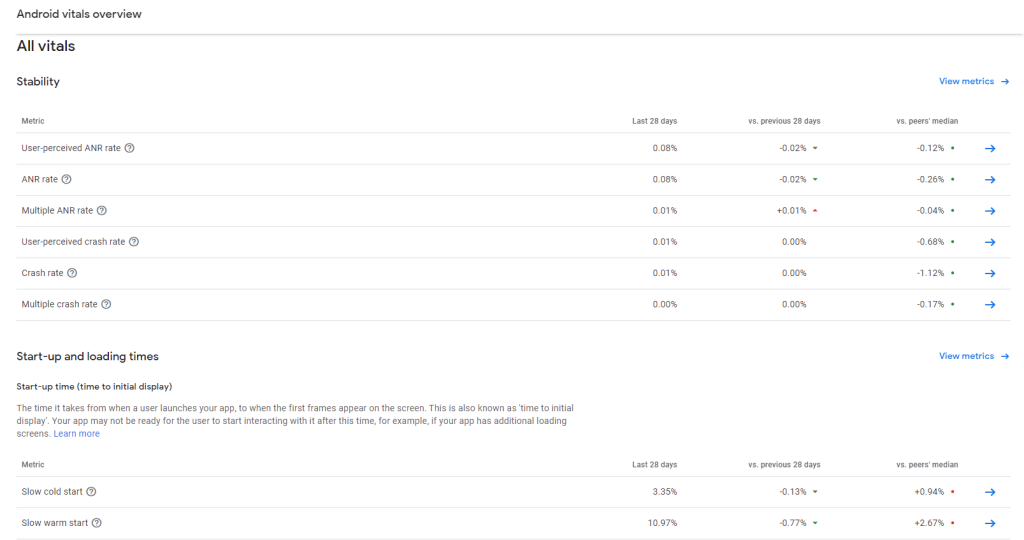
- All Vitals: This view is essentially a breakdown of the vital metrics that fall under each of these categories:
- Stability
- Start-up and loading times
- Rendering
- Battery
- Permissions
Performance
This part only pertains to games and does not apply to other app types. If you’re using the APT (Android Performance Tuner) integration, the performance section covers insights about potential performance issues with your game and information on how to prioritize and address them.
Crashes and ANRs
This section allows you to monitor app crashes and errors caused by unresponsive applications (ANR). These issues can be sorted by type and filtered based on various parameters, such as Android version, ANR type, region, device model, GPU, and more.
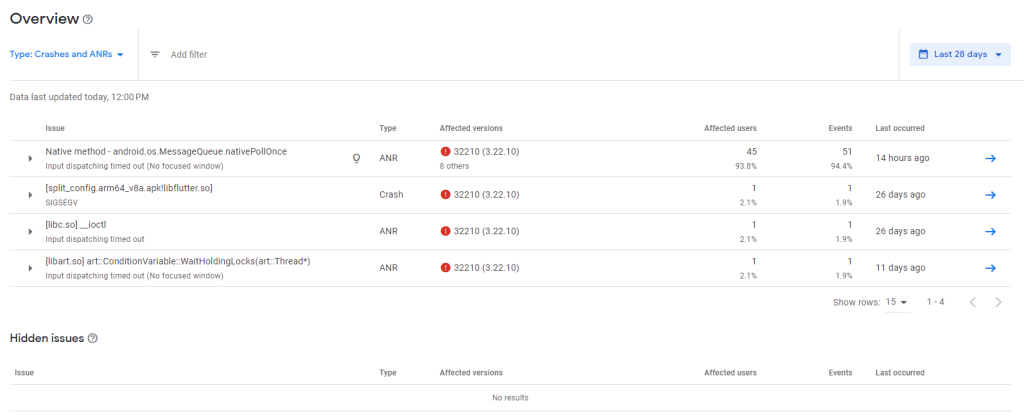
A plethora of issues can indicate app instability, which can significantly affect its performance in the Google Play Store. Therefore, we highly recommend regularly monitoring these metrics with your app’s developers.
App Size
Optimizing your app’s size can help reduce uninstalls. In the last report, under the Android vitals section, you can compare your app’s download size to similar apps on Google Play.
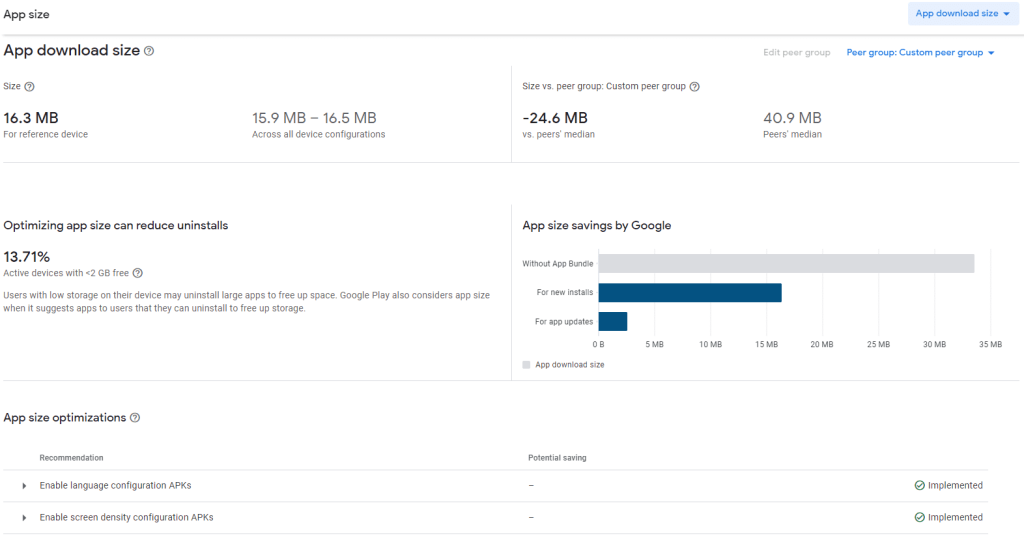
The report also offers useful metrics and recommendations for optimizing your app’s size based on an analysis of your most recent release. Don’t forget to consult with your app’s developer and implement them!
Part 5: Monetize
The Google Play Console’s Monetize section is where you can control everything to do with your app’s monetization strategy. Let’s go through each of the segments:
Products
Under the products tab, you can find three subsections:
- App Pricing: This is where you can adjust the price of your paid app and manage its sales.
- In-App Products: Here, you can set up one-time in-app products for sale. These can include virtual goods such as game-boosting packs or other virtual products.
- Subscriptions: This is where you add your app’s subscriptions. These could be recurring in-app services like a monthly subscription for a meditation app or a recurring login bonus for a mobile game.
Price Experiments
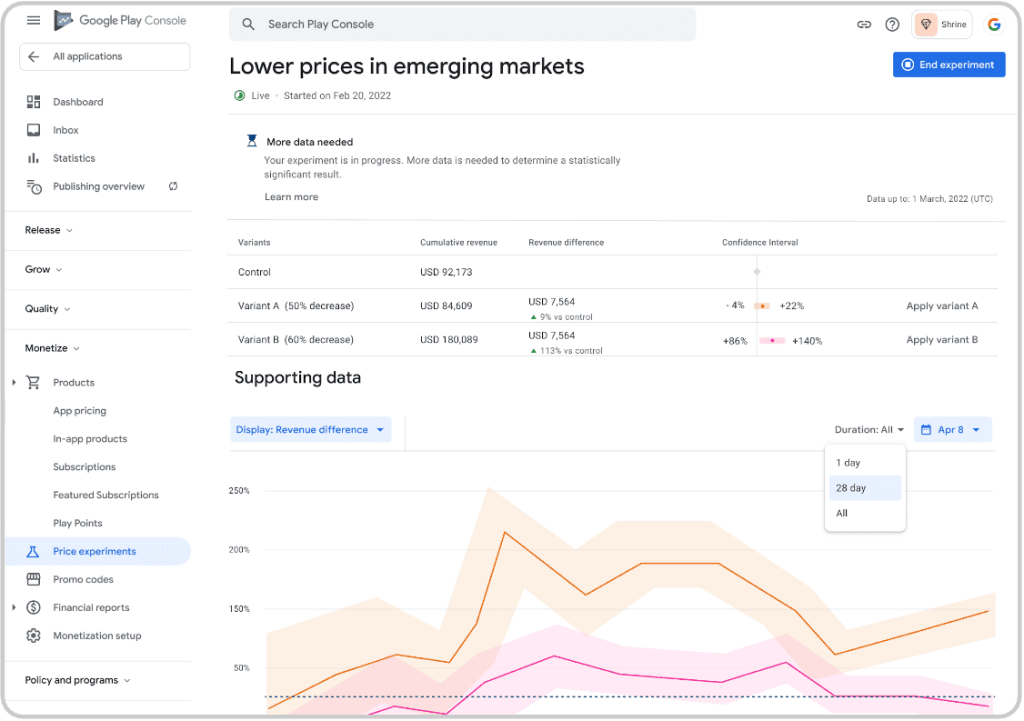
At this year’s Google I/O, Google introduced new monetization tools for Google Play apps. With Price Experiments, you can analyze and optimize your pricing strategy by testing different price variants for in-app products.
A/B testing your in-app product prices can help you tailor them to local markets, attract new customers, and persuade those who may have hesitated to make an in-app purchase.
Promo Codes
The Promo codes tab allows you to create two types of codes to offer free one-time products or subscription trials to a limited number of users. When users enter a promo code in your app or the Google Play Store, they can enjoy the item or trial free of charge.
- One-time use codes: These codes are automatically generated and can only be redeemed once.
- Custom codes: You have the flexibility to create custom codes that can be redeemed multiple times, up to a predefined limit. Custom codes are exclusively for subscriptions and can only be redeemed by users who haven’t subscribed before.
Promo codes can help you engage users and incentivize them to interact with your offerings. It’s a great way to foster user engagement and promote your products.
Financial Reports
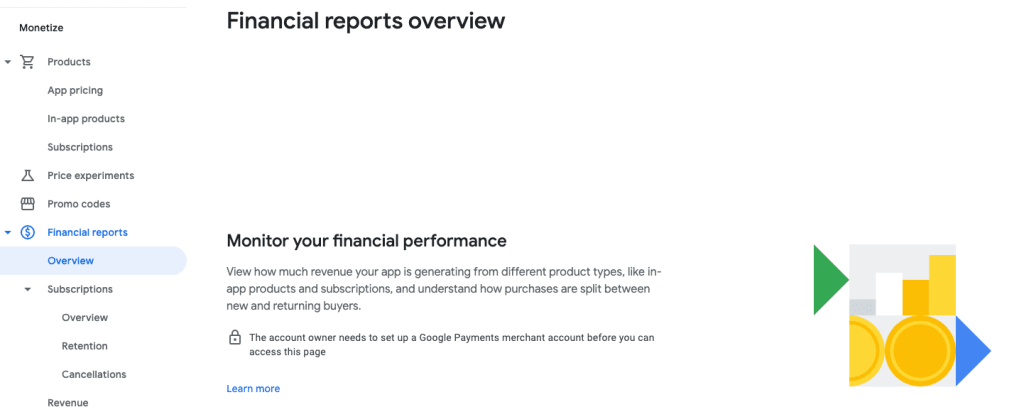
The financial reports tab allows you to get a look into your app’s financial performance. Keep in mind that you’ll need to set up a Google Payments merchant account before you can access this data.
Overview
This section allows you to effectively track your app’s revenue generation across various product types. Additionally, it provides valuable insights into the distribution of purchases between new and returning buyers. This comprehensive analysis can help you to better understand and optimize your app’s monetization strategy.
Subscriptions
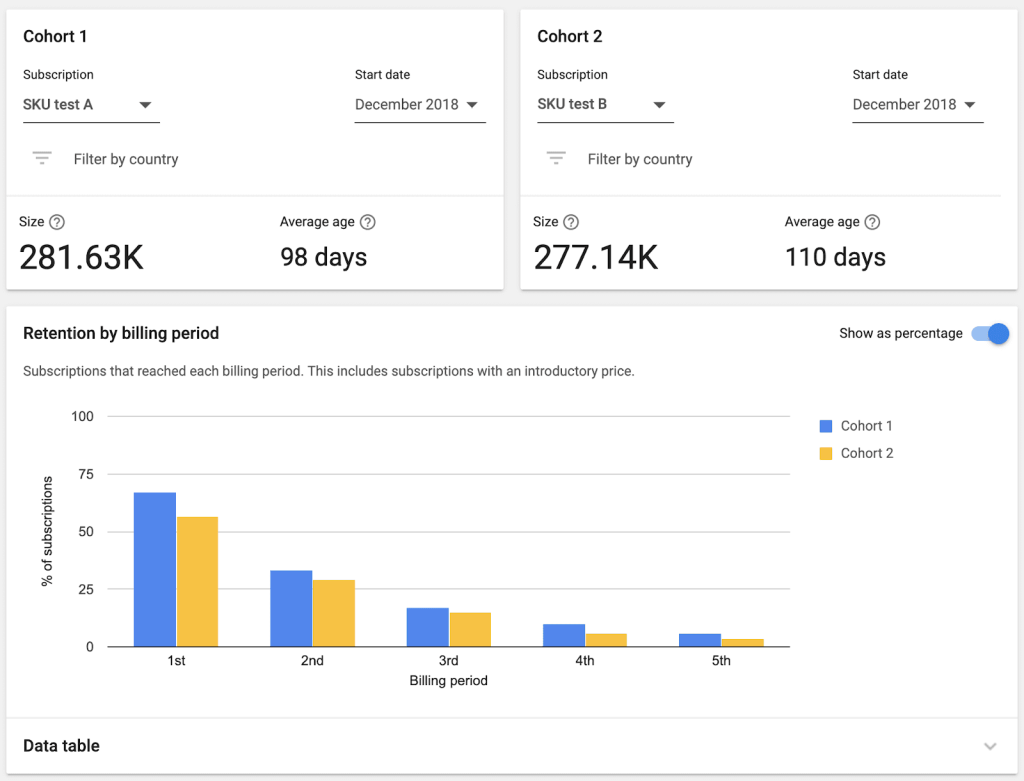
The subscriptions section provides a more granular overview of your in-app subscriptions performance. This data can help app marketers measure how much revenue is generated from each subscription tier, understand why subscribers cancel using survey responses, and track retention trends using billing reports and dashboards.
Revenue
Under the financial reports tab, you’ll also find the revenue section, which offers insights into your products. There, you can get a detailed understanding of revenue, orders, and refunds across different products, accompanied by in-depth information for each.
Buyers
The buyers tab encompasses buyer and ARPPU (average revenue per paying user) trends, enabling you to gauge the revenue generated from your users. You can filter this data by product, country, or device to monitor these trends.
Conversions
Here, you can gather insights into your users’ spending habits over time to check conversion trends and more. The spend per buyer metric shows the cumulative spend of buyers who installed the app in a given time period.
Monetization Setup
The final tab in the Monetize section contains critical settings for configuring subscriptions, receiving real-time event notifications, and managing app licensing. You have the option to enable or disable allowing users to pause their subscriptions, with the exception of free trial or annual subscriptions.
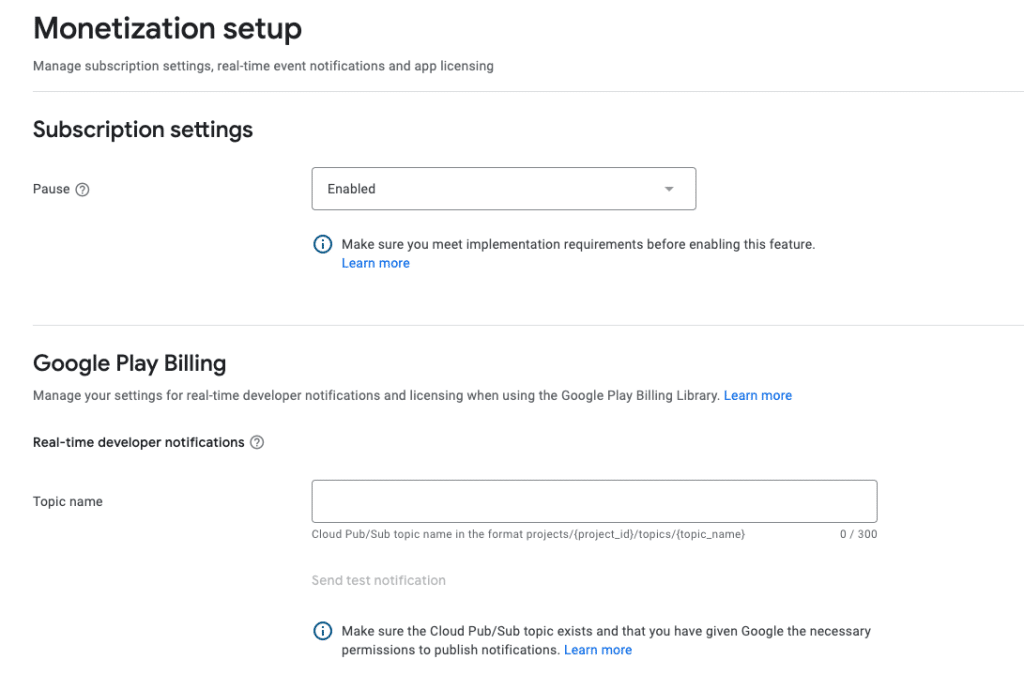
Additionally, you can configure your Google Play Billing settings through the Google Play Billing Library to efficiently manage developer notifications and licensing in real-time. If you are utilizing an alternative billing system alongside Google Play Billing, you can use the last section to set it up.
Part 6: Policy and Programs
We’re almost at the end of our comprehensive Google Play Console guide – and the last section left to cover is the Policy and Programs tab. There are three main tabs to learn about; Policy status, App content, and the Teacher Approved program.
Policy status
In this tab, you can review your policy status to ensure you’re complying with the Google Play Developer Program policies. Some of the obvious ones include avoiding restricted content, such as illegal activities and impersonation, while others are more specific and require careful review. We recommend checking this tab often to stay on top of your compliance status.
App content
You must declare your app’s content In order to ensure compliance with Google Play policies. In the “Actioned” tab, you can set up different declarations, such as your app’s privacy policy, whether it contains ads, its official content ratings, and any app content restrictions that should be set up.
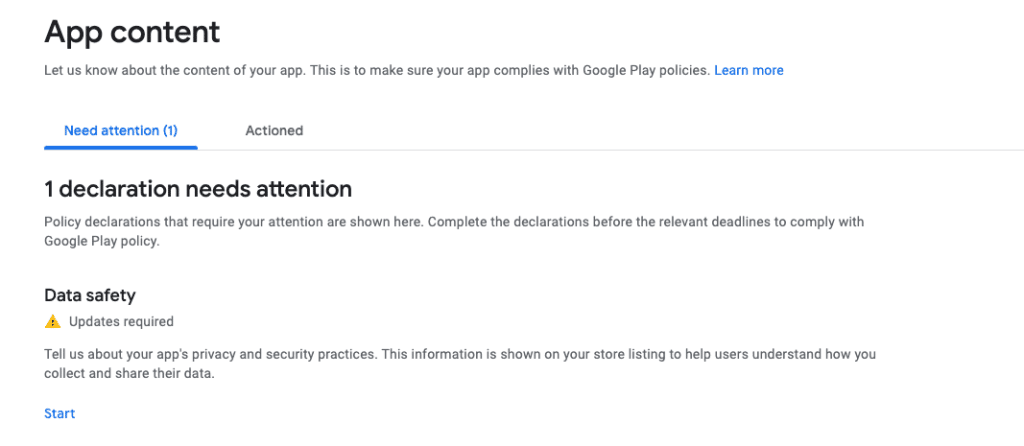
In the “Need attention” section within App content, you can check if any of the declarations you’ve made require updating.
Teacher Approved
The final tab in the Policy and Programs section only applies to apps that are designed for children. If your app fits this criteria, you can apply to participate in Google Play’s Teacher Approved program. This program can help your app to stand out among competitors as it will be showcased in the “Kids” category on Google Play. Once you apply, you can check the status of your application in this tab.
You can read more information about the ratings and criteria required to get your app Teacher Approved here.
Key Takeaways
Google Play Console is a powerful marketing tool that offers comprehensive app performance analysis on the Google Play Store. It provides revenue insights, app A/B testing, store listing optimization options, and a range of other helpful ASO and developer tools. Navigating through these sections effectively is vital for maximizing your marketing efforts and ensuring app success.
Despite the abundance of information, determining the best mobile marketing strategy for your specific app can be challenging. This is where an expert mobile marketing agency can assist.
With over 10 years of experience propelling apps to become category leaders in the mobile app market, Moburst’s team of ASO (App Store Optimization) experts & CRO (Conversion Rate Optimization) experts can help you exceed your goals and stand out from the competition in a crowded marketplace.
Ready to Build Your High-Impact Mobile Marketing Strategy?
Our team is always ready to help!
FAQs (Frequently Asked Questions)
What is the Google Play Console?
The Google Play Console is a suite of tools that allows app developers, marketers, and publishers to manage their apps on the Google Play store. It enables developers & marketers to upload, test, and release applications into production, as well as review analytics and track customer engagement. It also provides access to techniques such as staged rollouts, alpha & beta testing, and pre-launch reports.
How do I set up my app in the Google Play Console?
To get started with the Google Play Console, you first need to create a developer account at play.google.com/apps/publish/. Once your account is created, you can begin setting up your app in the console by completing all of the necessary fields, such as Pricing & Distribution details, App Content information, and Graphics & Multimedia. You will also be able to upload your APK file so that it can be tested in one of the available tracks (production, alpha, or beta).
What kind of analytics does the Google Play Console provide?
The Google Play Console provides various types of performance metrics for each app, including Installs & Uninstalls volume overviews; Daily Active Users (DAU), Monthly Active Users (MAU) & Session Length; Retention report; Crashes & ANRs; Pre-launch report; User Acquisition report; Performance insights Real-time report. These metrics are useful in helping marketers understand user behavior and gain insights into how they can improve their app’s experience.


